|
Birdland Swing
Rigging/Skinning Specs
-
1 default unit in Maya = 1 inch (leave the Maya preferences default 1 unit = 1 cm, but translate the units as inches. This is the standard for all Disney productions)
-
Our element pipeline is:
Mod > Rig > Skin > Tex
where Mod is a lo-res poly cage (all polygon meshes - delete subdivision surfaces before final saved version); Rig is the rig plus the lo-res cage; Skin is the lo-res cage skinned to the rig with the limit surface (subd) riding along with any special blendshapes/facial deformers/etc hooked up; Tex has UV coordinates and a texture applied.
-
We are NOT tech-supported by any production at Disney, so we are not using any proprietary Maya extensions. Try to use "clean" Maya (no plugins loaded except those that ship with Maya). If you must use third-party or proprietary Modeling tools, be sure to delete history afterwards so that the file can be opened on a machine without the plugin.
-
Always use Maya ASCII when saving from Maya. Use tif or psd for textures, and make sure all textures and other external references are located within the same Maya project directory (see below).
-
Use the layer editor in Maya. Put the meshes on a reference layer so animators won't select them. It is also good to put the rig on a reference layer and controls on a separate layer so that the only thing selectable when the animators get it are the controls.
-
Use NURBs curves for all controls. See me for a library of ready-to-use shapes if you don't have one already. Strive for controls to be intuitive with descriptive names. Add additional animatable attributes to the control objects. Whenever possible, combine controls into fewer controls (for example, a wrist control that both translates the IK effector AND rotates the wrist). All animatable attributes should be represented on a visible NURBs curve control - don't hide anything!
-
Enable drawing overrides on yer controller curves to color-code them. Left-side controllers should be blue, right-side red and center objects white or yellow.
-
Parent-constrain controller curves to keep them outside the rig hierarchy. Group them together for the ability to easily select all controllers via the Outliner.
-
All characters should have squash-and-stretch capability (stretchy limbs, nonlinear deformers for additional squishiness).
-
"A" characters should also have IK/FK blending. Come see me for some recipes.
-
Facial setup should be a combination of blendshapes and bones and/or clusters. If you use blendshapes, create a controller object to drive them from (something selectable/keyable in the scene; don't rely on the animators to search for the blendshape editor).
-
Scene hierarchy should be as follows. You should keep all geometry inside a group that ends with "_model" (you can prefix all these group nodes with the name of the element). It should be grouped inside a group called "_MISC", which should also contain all IK handles, deformers, everything outside the rig hierarchy. You should also have a group that contains the rig, something like "gerb_RIG", and another that contains the NURBs iconic controller objects, called "elem_CON", which are parent-constrained to the bones of the rig. The RIG, the CON and the MISC nodes should contain the entire character between them, and they should be contained within a series of upper transform nodes identical to the one used in the Disney pipeline (_ALL, _ORT, _TRS, _ROT). So the complete character hierarchy should look as such:
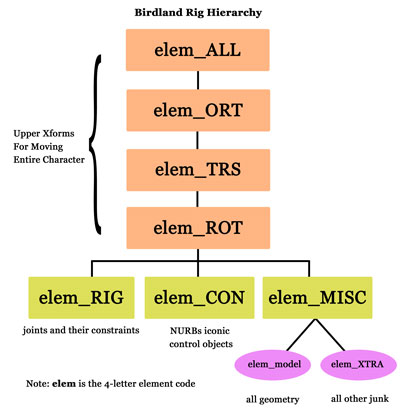
-
It's worth noting that, if set up correctly, the CON and XTRA groups inherit transforms from the upper nodes, while the RIG and model nodes do not.
-
The final rig file will be saved with "rig" as the department token, as in:
gerb_rig_evanhorn_v01.ma
-
Skinning: Use Maya's smooth skin on the meshes. Skin the low-res poly and save it as a separate file with the department token listed as "skin". Example: gerb_skin_evanhorn_v01.ma
You can parent-constrain rigid objects or wrap-deform clothing to characters if need be.
Starting a New Rig
Here is the preferred workflow for beginning the rigging stage:
-
Clear it with Production Manager John Ford before you begin.
-
Use the same project directory as modeling for the current element. Make sure all old files are moved into a backup subdirectory within the scenes directory and the only model file left in the scenes directory is the final one, the one you're starting with. Double-check the model file for correct size and good topology. If you need to make changes to the model, save it as a final mod file with your name in the user token, as in: gerb_mod_evanhorn_v01.ma
-
When you have applied any model fixes and are ready to build the rig, save it with the naming convention: elem_dept_user_v01.ma
(See the naming conventions page)
For example, gerb_rig_evanhorn_v01.ma
The rig file will be differentiated from the mod file by naming convention, so let them reside in the same directory.
-
When building a rig in Maya at Disney, always launch the Maya gui and CLEAR ALL EXTENSIONS so that you are using clean, vanilla Maya. This will keep you from resisting the temptation to use Disney rigging tools that, although fabulous, are not supported by our pipeline.
-
Check with Erik Van Horn for specific requirements for your rig.
-
You can work in as many intermediate files as you want (for example, build a facial rig in a separate file) as long as everything is merged back into one final rig file with the appropriate naming convention for check-in.
Check-In Checklist
When you are ready to check-in a file, email Erik VanHorn who will tech-approve it.
You should prepare your scene by doing the following:
-
Make sure the transforms of all controls are at 0,0,0 (freeze transformations).
-
Move all intermediate files in a rig WIP subfolder in your scenes directory. Only the final rig file and the final mod file should be on the maya\scenes level.
-
Clean up layer editor to just the layers in use. If blendshapes exist, keep them on a hidden layer. If you have low-res or high-res versions of the mesh, keep them on separate layers so animators can toggle visibility.
-
Observe the rig hierarchy, as outlined above.
-
Delete any junk nodes like temporary lights, etc.
|
|
Birdland Swing
Home
Pitch
Production Notes
Characters
Set
Maquettes
Misc. Concept Art
Storyboard
Story Reel (embedded)
Story Reel (50MB QT)
...right-click to save
Reference Pix
Production Log
Crew
Forum
|
|